Showing posts with label recipes. Show all posts

05 March 2014

February is for Heartbreak

February is the month of love. Thanks to that one singular day smack dab in the middle the whole month is flavored with gushy notions of love. Normally I get caught up in the hype, decorate the house, bake treats – but not this year! Nope. February has been a month of heartache and break-ups. It has been a rough month which has wiped me out emotionally. Saying a fond farewell to a long-term relationship was not easy, and there hasn’t been a day yet that I haven’t thought longingly about reuniting. Fantasized, really. I have gone so far as to live vicariously through others – and I must say it isn’t nearly as satisfying. During a snow weekend a few weeks ago I was out for a walk in the freezing cold, enjoying the beautiful white world, when I caught a hint of my forsaken love and it brought me to a full stop. I stood there on the sidewalk, in the snow, breathing deeply to a point of near euphoria. My resolve to end the relationship was worn thin and stretched almost to the breaking point. It was only a sense of social norms that kept me from walking up to the house from which the heavenly scent was coming from and asking for a cup of coffee.

Yes, that’s right. I’m talking about coffee.

Even though I have an obsessive love for that versatile bean, I decided to have a trial separation which started February 1st. I still long, yearn, and crave coffee.
Every.
Single.
Day.

On February 1st I started the auto-immune paleo protocol (AIP for short) which eliminates all high inflammation triggers such as coffee, chocolate, dairy, grains, nuts, seeds, eggs, nightshades, etc. It’s challenging, especially since it means I am making food from scratch for every single meal. (Although there is an awesome food cart called “Cultured Caveman” that has delicious food that is “safe” and has become my Friday treat.) It is a good thing I enjoy cooking because these days just about all my spare time is spent in the kitchen. But of all the things I gave up, coffee has been the hardest.

To help ease the transition, I have been making this weird “drink” that is surprisingly tasty. I found the inspiration on Mark’s Daily Apple. But have tweaked it to my own liking. Here is my variation:

Niffer's Warming Tea
Ingredients:
1 Can of whole coconut milk
½ can of water
½ - 1 tablespoon of turmeric
1 thumb size piece of ginger, grated
½ tablespoon of cinnamon
2-4 tablespoons of honey
(Tip: buy fresh ginger, peel it when you get home then stick it in the freezer. When you need ginger for a recipe, grate the frozen ginger using a Microplane grater and you end up with finely ‘shredded’ ginger.)

Directions:
Place everything into a pot and mix well. The turmeric will turn it bright yellow – be careful – turmeric will stain!! Heat on a low simmer for at least a half hour. Pour, and enjoy!

I leave the pot simmering and sip on small mugs of it during the day. Sometimes I add more honey when I need a sweet fix. Other days I add less water and have a more decadent drink. I've also mixed it up without the water and kept in the fridge overnight and make a mug by using the coconut milk mix and boiling water.


It sounds like a weird concoction but I made my mom try it and even she liked it (I’m still working on her to give kombucha and my homemade ginger kraut another try). Really, it’s a super healthy drink – coconut milk is chock full of good stuff, ginger is great for your digestive system, turmeric is a wonder spice that alleviates inflammation and can help fight cancer, cinnamon helps regulate blood sugar and is anti-bacterial, honey is anti-bacterial and soothing. Plus, it has a strong taste and a full mouth feel that mimics my coffee and cream. There are days when I actually crave this drink now. 

While I do hope that my break-up with coffee (and chocolate, and dairy, and nuts... everything that's off limits) isn't forever, for now we are total splitsville. What keeps me going is that I am actually starting to see small improvements. 
Dear Coffee, please just don't say good-bye forever. I miss you horribly. Really it's not you, it's me. I just need some time to heal, but I've never stopped loving you. I hope we can get back together real soon, because breaking up is hard to do.  Much love, Niff  xoxoxoxoxoxo


19 August 2012

Ladies Night Gets Hot Under the Collar!


We were headed to Bend for the weekend which, in my opinion, necessitates a stop in Sisters for refreshments after coming over the mountains. My mother sat across from me at the picnic table behind the Sno-Cap diner, watching me as I took my first bite of a jalapeno pepper jack cheeseburger. She just watched as I enjoyed that first bite, which is always the best, and let out a sigh of delight. Her own burger waiting in her hands while all her attention was on me. After a moment to chew she asked if it was good. I gave an enthusiastic "mmm-hmmm!!" while my mouth burned with delight. "Is it spicy?" she asked. "Oh, yeah!" I replied as I wiped my nose on the back of my hand, it already running from the heat of the peppers. "I have NO idea where you came from!" mom offered back, sounding dumbfounded. We laughed at the oddity that I am in the family, the only one who likes spicy food among a bunch of milquetoast eaters. For crying out loud, my dad thinks garlic is too spicy! Garlic! It doesn't even have any heat! I am happy being the anomaly in the family, adding hot sauce, cayenne, and peppers to my food freely and liberally. I finished my cheeseburger, slowly, frequently stopping to let the fire die down enough so that I could actually taste it again, and to dab away the tears that would well up in my eyes, or wipe away the snot that threatened to run down my upper lip. That was one good burger!

I don't know what my body is trying to tell me, but this summer has been the season of jalapeno cravings. And I do mean crave! That's weird, right? I think so. I have been coming up with some creative ways to add the green heat to different dishes, but one tops it all - jalapeno popper dip!

I tried it out for the first time for ladies night several weeks ago. On a balmy Saturday evening a group of us gathered at Katie's house for food, conversation, laughter, and friendship. For the most part we were all friends in high school. Although they have maintained the relationships over the years, I am just recently re-forging these friendships - much to my delight. I was thrilled when I was invited to girl's night, my awkward self-conscious inner teenager was amazed that I was being included into the inner circle with the cool kids. This meant I needed to impress them with my culinary contribution to the Mexican themed dinner; I wanted to prove my value and worth to the evening's offerings with hopes of being invited again. This seemed like a perfect occasion to try out the recipe that I had recently pinned and hadn't stopped thinking about.

While it was a big hit and was very tasty, I felt it missed the mark. It tasted like a really good spicy queso dip, but not a dip reminiscent of jalapeno poppers. Of course I didn't follow the recipe exactly - that just isn't in my nature. Instead of the fresh and canned jalapeno, I substituted diced roasted jalapenos. Oh, and I used Trader Joe's Extra Extra New York Sharp Cheddar and Black Pepper Crusted Parmesan. One last tweak - since Traders doesn't carry fat free cream cheese, I used light. But I made up for this by using Fage 0% Greek yogurt. Oh... and, forget the bread crumbs.
Here is the original recipe: Jalapeno Popper Dip

Since then I have been experimenting with the recipe and have come up with something that I really like, that truly is reminiscent of a jalapeno popper! I can't stop eating the stuff! I still have a little refinement to work out, I'm not totally happy with the consistency as it has to be fairly hot for it to be dip-able. But at room temperature or cold, it is solid enough to use as a spread, which has its advantages as well (think sandwiches).


Here is my version:
Jenn's Jalapeno Poppin' Dip
Ingredients:
  • 1 block (8 ounces) of light cream cheese
  • 1 cup of Greek yogurt (I prefer Fage brand)
  • 1 cup of sharp cheddar (Tillamook's Vintage White Sharp Cheddar is especially good)
  • 2 (or more) roasted jalapenos, finely diced - ribs and seeds removed, if any of the skin is extra black you may want to remove that as well. 
  • 1/2 - 1 teaspoon of salt
  • 1/4 teaspoon of cumin
  • 1/4 teaspoon of chili powder
  • 1/4 teaspoon of cracked black pepper
  • 1/4 teaspoon of sugar
Directions: 
Dump everything into a saucepan over low-med heat and stir frequently until the cheddar is melted. Done. Yes, it really is that easy. 
I used a stick blender with just some of the yogurt and jalapeno to make a paste so that the jalapeno would be more evenly distributed. A sprinkle of some bacon crumbles on top would be a nice touch too. Let it sit for a day and the heat and flavor will develop more robustly. 
Transfer to a serving bowl and set it out with tortilla chips, red bell pepper strips, cucumber sticks, or Jenn style - with a big spoon. Or spread it in a tortilla and add some chicken, tomatoes, spinach, and black olives for a tasty wrap.


ENJOY!!

(And invite me over when you make a batch!)

14 July 2012

Brownies, you're the BOMB!

I don't need much of an excuse to bake.
Any of these reasons would do:
  • Mr. Cranky-Pants birthday
  • Kristi's birthday
  • Lindsay's birthday
  • Mr. Cranky-Pants visit to Portland (and he insists that I bake him something every. single. time. he visits.)
  • and because of this...

Trader Joe's is now selling crack, er... Speculoos Cookie Butter. 

Since all of the above reasons happened within two weeks time, it wasn't just a good excuse to bake, it was a necessity - and it needed to be over the top good. I have been holding on to this recipe, waiting for a good time to pull it out and drop this sugar bomb. This was it!

A gal at Bible study bought these one week and they were unreal! I'm not sure what she called them, but I have dubbed them "Brownie Bombs" because they are deceptively heavy and fall with a thud, because they cause an explosion on your taste buds, and it feels like a bomb went off in your belly after eating one. A very tasty sugary bomb. 

Start with these essentials:
Okay, those who know me, will understand that I tend to tinker and rarely follow a recipe exactly as written. It's that rebellious spirit in me. So let me state up-front that it would be easier to buy a box brownie mix and fix it according to the package directions. And the original ones I based this on used creamy peanut butter instead of Cookie Butter. But, c'mon! Why? WHY? Why would you use peanut butter when God created Cookie Butter?!?!

Ingredients:
Brownies:
1 box of chocolate flavored cake mix (such as Devil's Food Cake, Dark Chocolate, etc.)
2 eggs
1 stick of butter (1/2 cup), very soft
1/4 cup of dark brown sugar
1/4 unsweetened cocoa powder
1/2 cup of water
2 teaspoons of vanilla extract
1/2 teaspoon of sea salt

Also needed...
- 1 1/2 boxes of chocolate sandwich cookies (I recommend Trader Joe's Joe-Joe's, or Whole Foods 365 sandwich cremes, but not the national brand that comes in the blue box.)
-1 jar of Speculoos Cookie Butter (or peanut butter, but not the natural kind like Adam's brand)

Optional toppings...
Trader Joe's "Way More Chocolate Chips Cookies"
Ganache:
8 ounces of semi-sweet chocolate
1/2 cup of heavy cream
1/2 packet of Starbucks Via instant coffee powder

Instructions:
Preheat the oven to 350°
Add the cake mix and butter to an electric stand mixer (or a large bowl and use a hand mixer) and combine slightly, add in all of the remaining ingredients and mix for a couple minutes. It will be a very thick batter. Because of the fluffy thickness, again, it may be easier to mix up a regular brownie mix that is a bit runnier. But, I made a couple just brownie cupcakes (because I ran out of cookie butter. GASP! The horror!!) and they were pretty much the best brownie I've had in a long time. Just make the cake mix brownie batter. And if you are wondering why I made brownies using a cake mix, well... I'm trying to use up my stash of unhealthy food and get it out of my house. 
Set the brownie batter aside.

Next
Take two (yes, 2. 1,2, do-si-dos) of the sandwich cookies. Smear one with a big dollop of cookie butter and sandwich it together with the second cookie. Like this...
YUMMY!!
Drop this into a cupcake liner in a muffin pan.

An alternative, if you are not using the nasty chemical blue box kind, is to twist a sandwich cookie apart and spread the inside with cookie butter and only use the one cookie. I tried lots of variations. Several variations on cookie to butter ratio, and methods of application, and various baking times. Each batch looked a little different.

Now...
Cover each cookie with brownie batter. One of the variations I tried was putting a scoop of brownie batter into the cup and pushed the cookie sandwich down into it - that didn't work quite as well. If it had been regular (read, runny) brownie batter, it might have been better. I was trying to get the brownie to encase the sandwich better. If you find a way that works, let me know.
Bake for somewhere between 18-24 minutes. (Sorry, you'll have to figure it out exactly.) 
While the brownie bombs are cooling, mix up the ganache by adding all the ingredients into a microwave safe bowl or to a double boiler. In the microwave, heat in 20 second increments, stirring in-between until it is smooth. Spread a spoonful of the ganache on top of the cupcake and top with a "Way More Chocolate Chips Cookie." 
You'll end up with this...

It is very nice!!

Wondering what it looks like on the inside? Are you prepared for this? These really are the bomb-diggity-dot-com best brownies.

Oh, yeah! You can thank me now - and later. 

24 June 2012

Party Cookies

Opening up my email on afternoon several weeks ago, I was greeted with a reminder for an event the next evening; an event to which I was supposed to bring a dessert. It would be so helpful if I had put that on my calendar. Alas, I needed a quick and easy treat, to give myself an extra challenge I wanted to use as many ingredients that I had on hand as possible. I turned to my favorite web-source of recipes: Pinterest. The weather is turning relatively warmer and chocolate seemed too heavy. I knew I had a package of funfetti cake mix in my cupboard, then I found a recipe for cake batter cookies, and with that I had a plan...

Lemony Funfetti Party Cookies!

Here is what you'll need:
1 - box of Funfetti cake mix
1 cup - white chocolate chips
1/2 cup - plain yogurt
2 - eggs
1 - lemon, zest & juice
1 teaspoon - vanilla extract
1/2 teaspoon - lemon extract
dash of salt

Mix
Scoop
Bake 10-12 minutes at 350°


Like I said, I needed something quick and easy and that was a selling point on this recipe. Basically, you dump everything into one bowl and stir it up until just mixed. The dough was really sticky and stiff which made scooping it out a little challenging, I think this was due to replacing the oil with yogurt. I made the substitution to make it a smidge 'healthier' and in hopes of adding some extra tang.

Simply scoop the batter onto a cookie sheet lined with a Silpat®
Bake them for 10-12 minutes at 350°; they won't change color much, just a little tan on top, so be careful not to over bake them. 


I made mostly popper size cookiettes, but I also made a few bigger "regular" size cookies. Straight out of the oven (with a little time to cool) I think the bigger ones tasted better. Yet, the smaller ones tasted very good and even better the next day. 

Yummers! Tangy, zingy, lemony, creamy & happy cookies! 

29 January 2012

Chubby Hubby Reinvention - Take #2


I got my baking groove on over the holidays and made some great treats. For Christmas I made one of my favorite desserts- chocolate bread pudding using panettone for the bread. It is beyond decadent! For dad's birthday (known to the rest of the world as New Year's Eve) we celebrated with peppermint chocolate cheesecake bars, a recipe I found courtesy of Pinterest, my obsession is paying off with very tasty treats. Then there were the neighbor goodie bags filled with puppy chow/muddy buddies/monkey munch - let it be known that by whatever name you call it -  I make the best, spritz cookies, homemade peppermint marshmallows, and candy cane hearts. And it wouldn't be Christmas without maple pecan sticky buns. No wonder I gained weight over the holidays, even though I gave most if it away. But the new year has started, I am setting the goal that I will get to a healthy weight this year with Project: {me}, I have teenage boys to keep up with after all, so it's not really an option. Yet it was hard to get back on track with healthy eating after so much indulgence. Not helping in the efforts was the leftover ingredients hanging out in my pantry and fridge. (Cream cheese makes my diet brownies taste so much better!) The only thing to do was make one last epic dessert using all the leftovers. I took stock of what was on hand, particularly those items that are a weakness and/or couldn't be stored in my garage pantry long term, out of sight and out of mind. I wanted to avoid buying any more ingredients to complete a recipe, the point was to get rid of things. I came up with this list: cream cheese, peanut butter, eggs, pretzels, chocolate chips. It was really just the eggs and the cream cheese I needed to get rid of, the pretzels are not a temptation but they would go stale, and then I'd just throw them out, and that is just wasteful when they could be made into something yummy.


Pondering that list and knowing the other things I had on hand I started thinking about a new reinvention of chubby hubby. This time instead of a cookie base, what about mainly cheesecake... mmm... peanut butter cheesecake, that's an excellent starting point. I delved back into Pinterest world to help me shape my idea. This is what I came up with: Peanut Butter Pretzel Cheesecake bars.  Will you allow me to brag for just a moment? These things are amazingly
scrump-dilly-icious!! 
I took the pan to work and they got rave reviews, it was a major hit with the guys, especially in the media department. The pan was empty before the end of the day, always a good sign.

Want to try them for yourself? Here is what you need.

Equipment: A stand mixer with the whisk attachment and food processor with  the metal blade.

Ingredients:
Crust-
2 packets of grahamies (or graham crackers to a normal person)
1/2 teaspoon cinnamon
1 teaspoon salt
2 handfuls of mini-twist pretzels
1 stick (8 tablespoons) of butter, melted

Filling-
1 cup brown sugar (packed)
2 blocks of cream cheese (room temperature)
1 cup peanut butter (creamy will work best, and not the natural kind)
1/3 cup half n' half
4 eggs (room temperature)
1 teaspoon salt
2 teaspoons vanilla extract
1 teaspoon cinnamon

Topping-
2 cups semi-sweet chocolate chips
4 tablespoons of butter
2 tablespoons of half n' half
3 ounces of crushed peanuts
2 handfuls of mini-twist pretzels, broken into pieces

Directions:
For the crust: In the bowl of the food processor, put in all the 'crust' ingredients except the butter. Turn it on and let it do its thing until the graham crackers and pretzels are obliterated into a sand like consistency. With the machine running, slowly pour in the melted butter through the feed tube. I would suggest doing it in two batches, stopping the machine in-between and scraping down the sides. After all the butter is added let it run a little longer to make sure it is all mixed together well. Once it seems mixed and about the consistency of damp sand and will clump together, dump it into a 9x13 baking pan, patting it into a nice even layer along the bottom. Bake it at 350° for 12 minutes. Take it out of the oven and let it cool while you whip up the rest of the dessert.

For the filling: In the bowl of the stand mixer add the brown sugar, cream cheese and peanut butter. You might want to give it a bit of a start on the mixing with arm and spatula as the cream cheese and peanut butter are kind of thick at first. Once it is blended together add the rest of the ingredients and mix until it is well mixed and a little foamy. Remember to periodically stop the mixer and scrape down the sides. When it looks ready, pour it over the crust. Bake at 350° for approximately 25-30 minutes - until the middle only sorta jiggles a little when the pan is wiggled. Let it cool before putting the topping on.

For the topping: In a microwave safe bowl, preferably glass or ceramic (I'm convinced plastic adds an odd flavor), add the chocolate chips, butter, and half n' half. Microwave for 30 seconds and then stir really well. Microwave in 10 second intervals until melted, smooth, and combined. Spread it over the top of the cooled cheesecake, moving quickly, while it is still warm press broken pretzel and peanut pieces into the chocolate.

ta-da!!
Chubby Hubby inspired Peanut Butter Cheesecake Bars!

(Notes: I used half n' half because that is what I had, but if I were making this again I would use sour cream in the cheesecake filling for a little more twang, maybe upping it to 1/2 a cup. The batter had a strong punch, but once cooked it was rather mellow. Also, the topping could have been better using heavy cream instead of the half and half, and a little more of it at that.)

26 January 2012

Chubby Hubby Reinvention - Take #1

I have a slight addiction to Pinterest. And to food blogs. It's a dangerous combination, especially when a favorite co-worker is having a birthday. Jon's birthday was early December. I had a little giftie for him already, it had been purchased at a sale two months earlier. But it is expected by my co-workers to bring in baked goods on birthdays, at least those who have a earned special favor with me. If you've been reading this blog for any length of time, you know Jon has curried much favor with me, which meant I needed to pull out the big guns and come up with something amazing.
I started regularly checking the food category on Pinterest and carefully considering each dessert recipe that popped up the various food blogs that I follow. What was going to be the winning idea? I found inspiration in a post from Brown Eyed Baker for Chubby Hubby Truffles.

As amazing as they sounded, it was too much work and effort to make truffles for a crowd at work, even if it was for Jon. But it got me to thinking... what about a peanut butter pretzel cookie? After looking at scads of recipes for peanut butter cookies, blondies, peanut butter blondies, chocolate peanut butter cookies, peanut butter brownies, I came up with this: Jon's Birthday Chubby-Hubby Brownie-Cookie bar.
I collected ingredients from my pantry and with an idea in mind, got to work.

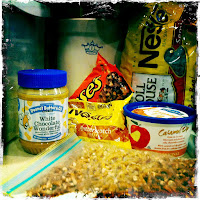
The Supplies

I made a standard brownie box mix adding a little coffee grounds (maybe about a tablespoon) to the mix. I believe coffee and chocolate are the nectar of life, and as such deserve to always be paired together. I poured it into a lasagna pan which is a little bigger than your standard 9x13 and set it aside.

Next came the cookie part. I started with a basic peanut butter cookie recipe from Cook's Illustrated, my go-to source for all things food and kitchen related. But I don't follow directions well, and tweaked the recipe a bit. I used 1/2 a cup of White Chocolate Peanut Butter, which I had on hand because Brown Eye Baker had raved about it and when I saw it at Target it magically jumped into my cart, and 1/2 a cup of crunchy peanut butter - because that is what I had. The recipe called for actual peanuts (crazy! a peanut butter cookie with peanuts?!) but since I don't like them unless in butter form I didn't have any and left that ingredient out. I then actually followed the directions, until it came to the add-ins. I precisely measured and added by the handful semi-sweet chocolate chips (about 1 cup), peanut butter chips (maybe 1/2 cup), butterscotch chips (a generous 1/4 cup), and broken up pretzel bits (close to 1 cup). Turn the machine on and let it do the hard work of incorporating all of that chippy goodness into the dough.


The dough ended up being really stiff. There was no way I was going to be able to spread it over the brownie base like I had intended, especially as the brownie batter was rather runny. Hm... what to do. Scoop it!


I ended up scooping out the cookie dough, covering the brownie batter filling in gaps here and there. It was time consuming and my hand hurt by the time I was done. Next time, if there is a next time, I'd reverse the two layers. Put the cookie dough on the bottom, patting it into place to cover the whole pan, then top with brownie batter. Oh... then maybe when it's done, it could be frosted... with peanut butter buttercream, or caramel buttercream, and dusted with pretzel bits... I think there will be a next time.


Okay, back to this baking venture. Once the cookie dough was more or less covering the brownie mix, I dropped spoonfuls of caramel sauce all over the top. It was another, 'Hey, I have this in the fridge from this other event, let's add it in!' But I think Kraft caramel squares, maybe cut in half or quarters, would work better, sprinkled over the brownie layer. Next time.

I wasn't sure how long to bake it, so I went with the brownie instructions since they had a longer time, adding 10 minutes to account for the extra thickness. It still needed a few more minutes, but then it went too long. When it came out of the oven the cookie part was a bit dark, maybe a little overdone, for my liking (another reason to reverse the layers).

Ta-da!! Doesn't it look scrumptious? (If not a little overly yellow because of the film+lens combo in Hipstamatic.)


I would show you a cut view, but I forgot to take one... and it didn't last long at work. This recipe is not for the weak. I mean that literally. The stinking thing weighed a little over 7 pounds. Lugging that to work on the train was a trick, but Rockstar deserved it.
Happy Birthday, Jon!! 

16 March 2009

Cake Pops

This weekend was chock-a-block full of things that needed to be done: mid-term exam, homework, personal reflection paper, bills to be paid, birthday package that needs to be put together and mailed off (two months late already), bathrooms to clean, laundry, and the list could go on. But the most important thing this weekend was a baby shower for a co-worker. So forget all that other trivial stuff - I spent the weekend making cake pops for the shower on Sunday afternoon. Aren't they cute!! Thanks Bakerella for the inspiration!

Now for that mid-term...
Posted by Picasa

22 March 2007

My New Toy

Most of you know that I love to cook. I especially love to bake but since learning about my extensive food allergies in December that has taken a back seat. I need to find a good substitute for eggs - any suggestions? With the new year magazines were all about helping us get organized and Real Simple was no exception. They even gave several ways to tame the unruly beast of recipe collections. Being the geeky type that I am I was was immediately drawn to the electronic suggestions. One of their two suggestions (the other was for the more enlightened Mac owners) was for a program called Big Oven. How could you not like a program with that name? I gave it a try and after playing with the trial version for a day I had to buy the whole program, which is reasonably priced, about the same or even less than most of my cookbooks. So I'm giving them a big plug today. There are a couple quirks which I believe will be changed with the new version that is rumored to be coming soon-ish, such as no spell check. But this withstanding it is super easy to use and fun. You can add recipes from any website with a few clicks. Create menu plans for a day to a month at a time with a simple click and drag, and make a shopping list in a snap. For those who, like me, aspire to organization you ought to check it out. Plus, the company is based in Seattle area - gotta support the home boys! If you do sign-up let me know so that we can swap recipes and menus in our own community!